Make Your Solar Garden Lights Shine Perfect Every Time

Transform your outdoor space instantly with solar garden lights by following these essential activation steps. Remove the protective tab from the battery compartment to establish the initial connection. Position each light in direct sunlight for 8-12 hours before first use, ensuring the solar panels face south for optimal charging efficiency. Locate the power switch (typically underneath the light cap or on the base unit) and slide it to the ‘ON’ or ‘AUTO’ position. Most units activate automatically at dusk, but verify proper functioning by covering the solar panel briefly to simulate darkness. Consider seasonal adjustments to light positioning, as shorter winter days require maximum sun exposure for reliable performance. This sustainable lighting solution combines innovative technology with practical garden enhancement, requiring minimal maintenance while delivering consistent illumination throughout the year.
Preparing Your Solar Garden Lights for First Use
Initial Inspection and Assembly
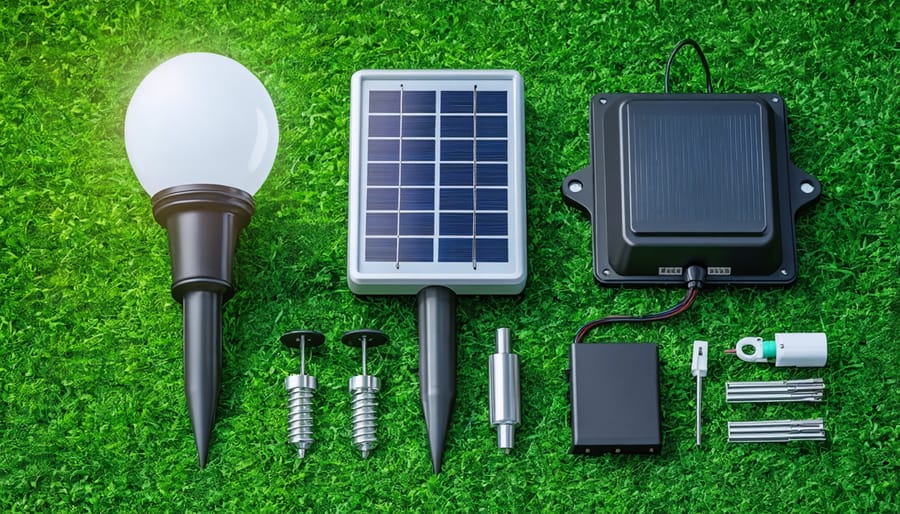
Before activating your solar garden lights, carefully unpack all components and verify that you have received a complete set. Each light typically includes the main body, solar panel, mounting stake, and any decorative elements. Check for any visible damage or defects, particularly on the solar panels and LED components.
Begin assembly by connecting the stake to the main light body, ensuring all parts fit together securely. If your model features detachable solar panels, confirm they’re properly aligned and firmly attached. Many European models include weather-resistant seals – verify these are correctly positioned to maintain the light’s IP rating.
For multi-piece designs, follow the manufacturer’s assembly diagram precisely. Pay special attention to any water-tight connections, especially in regions with frequent rainfall. Before proceeding with installation, test the manual on/off switch if present, and ensure the battery compartment is accessible and properly sealed.
Carefully remove any protective films from the solar panels, as these can significantly impact charging efficiency.
Battery Preparation
Before activating your solar garden lights, proper battery preparation is essential for optimal performance. Begin by locating the battery compartment, typically found on the upper section or underneath the solar panel. Remove any protective tabs or stickers that prevent battery drainage during shipping.
Most solar garden lights come with rechargeable batteries pre-installed, usually NiMH (Nickel-Metal Hydride) batteries. If you need to install batteries, ensure they are positioned correctly according to the polarity indicators (+ and -) marked inside the compartment. For best results, use high-quality rechargeable batteries rated at 1.2V.
Before first use, allow your solar lights to charge for a full day in direct sunlight with the power switch in the OFF position. This initial charging cycle helps condition the batteries and ensures optimal energy storage capacity. If your region experiences limited sunlight, consider extending this initial charging period to 2-3 days for better performance.
Perfect Placement for Maximum Performance
Sunlight Exposure Requirements
Proper sunlight exposure is crucial for your solar garden lights to function optimally. Position your lights in areas that receive 6-8 hours of direct sunlight daily, ideally during peak daylight hours between 10:00 and 16:00. When selecting installation spots, consider seasonal changes in sun patterns and avoid areas that may become shaded as vegetation grows.
Be mindful of potential obstructions such as trees, buildings, or tall shrubs that could cast shadows over your solar panels. Even partial shade can significantly reduce charging efficiency. For European installations, angle your solar panels slightly towards the south to maximise sun exposure, particularly during shorter winter days.
To ensure consistent performance, regularly check that leaves, dirt, or snow aren’t blocking the solar panels. If your garden has limited sunny areas, consider mounting the lights on poles or elevated surfaces to capture more direct sunlight. Remember that charging efficiency may vary depending on your geographical location and local weather conditions, with northern European regions requiring particularly strategic placement during winter months.
Installation Angles and Heights
For optimal performance, position your solar garden lights at a 45-degree angle facing south in the Northern Hemisphere. This angle maximises exposure to sunlight throughout the day, ensuring efficient charging of the solar panels. Install the lights at a height of 30-60 centimetres above ground level for pathway lighting, or up to 2 metres for broader area illumination.
Avoid placing solar lights in heavily shaded areas or beneath overhanging structures. Even partial shade can significantly reduce charging efficiency. When installing multiple lights, maintain a distance of 1.5-2 metres between each unit to prevent overlapping shadows and ensure even light distribution.
For wall-mounted solar lights, position them at least 2 metres high and angle the panel slightly downward to prevent water accumulation while maintaining good solar exposure. In urban settings, consider potential light pollution from street lamps or building illumination that might interfere with the light sensors.
Remember that seasonal changes affect sunlight angles. You may need to adjust your lights’ positioning slightly between summer and winter to maintain optimal charging efficiency.

Activation and Testing
Initial Power-Up Sequence
Upon receiving your solar garden lights, locate the power switch, typically positioned on the light head or stem. Before first use, ensure the lights receive a full day of direct sunlight to charge the batteries completely. Most models feature an auto/off switch – select ‘auto’ for automatic dusk-to-dawn operation. If your lights offer multiple lighting modes, cycle through them using the mode button until you find your preferred setting.
For optimal initial performance, allow the batteries to complete 2-3 full charge and discharge cycles. This conditioning process helps establish proper battery capacity and extends operational life. During this period, observe how your lights perform and adjust their positioning if needed to capture maximum sunlight.
Some advanced models include remote controls or smart features requiring additional setup steps. Consult your product manual for specific instructions, as activation procedures may vary between manufacturers and models. Remember that initial performance might not reflect long-term capabilities until the batteries are properly conditioned.
Performance Testing
Once your solar garden lights are installed, conduct a thorough performance test to ensure they’re functioning correctly. Wait until dusk or simulate darkness by covering the solar panel to verify proper activation. Check that each light achieves optimal brightness levels and maintains consistent illumination throughout the evening.
If lights aren’t performing as expected, verify that the solar panels are free from debris and positioned to receive maximum sunlight. Test the automatic sensors by alternating between light and dark conditions. For newly installed lights, allow 2-3 full charging cycles to reach peak performance.
Monitor light duration during the first few nights. Quality solar lights should provide 8-12 hours of illumination when fully charged. If performance falls short, consider adjusting placement or checking for obstructions that might affect charging efficiency. Keep a maintenance log to track performance patterns and identify potential issues early.
Maintenance Tips for Lasting Performance
Regular maintenance is crucial for maximising the performance and lifespan of your solar garden lights. Clean the solar panels monthly using a soft, damp cloth to remove dust, pollen, and debris that can reduce charging efficiency. Avoid harsh cleaning agents that might scratch the panel surface.
Check and tighten any loose connections quarterly, paying special attention to the battery compartment and panel housing. Replace rechargeable batteries annually or when you notice diminished performance, as battery capacity naturally decreases over time.
During winter months, consider removing and storing your lights indoors if they’re not actively used. If keeping them outside, ensure they’re positioned to receive maximum available sunlight during shorter days.
Monitor your lights for signs of water ingress or damage to the housing seals. Address these common solar light issues promptly to prevent internal component damage. Keep vegetation trimmed around the lights to prevent shadowing and maintain optimal charging conditions.
For optimal sustainability, dispose of old batteries at appropriate recycling facilities and keep spare parts on hand for quick repairs when needed.
Solar garden lights offer an elegant, sustainable solution for illuminating your outdoor spaces while contributing to a greener future. By following the proper installation steps, ensuring optimal placement, and maintaining your lights regularly, you can enjoy reliable, cost-effective garden lighting throughout the year. Remember to give your lights a full charge before first use, keep the solar panels clean, and position them where they receive maximum sunlight exposure. As Europe continues to embrace renewable energy solutions, your solar garden lights represent a small but significant step toward sustainable living. With minimal effort and proper care, these eco-friendly fixtures will transform your garden into an enchanting evening retreat while reducing your environmental impact and energy costs.
Leave a Reply